
Aircraft Overview
A-10 Warthog
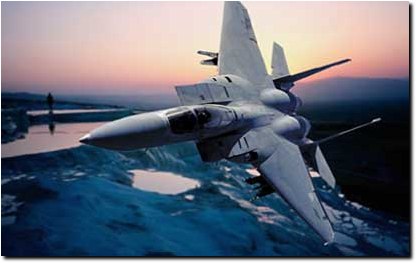
F-15C Eagle
MiG-29G Fulcrum
Basic Training
Takeoff/Landing
Maneuvering
Stall Recovery
Navigation
Mid Air Refueling
Formation Flying
A2A
Weapons
Cannon
AIM-9M
AIM-7
AIM-120
R-73
R-27R
Air to Air Tactics
Wingman Tactics
BVR and Doppler Notch
Missile Evasion
F-15C vs. Su-27
MiG-29G vs. Su-27
Intercept Profiles
A2G Weapons
Cannon
Rockets
AGM-65 Maverick
Iron Bombs
Laser Guided Bombs
Cluster Bomb Units
Air to Ground
Tactics
Terrain Masking
AAA Evasion
SAM Evasion
Threat Assessment
Advanced Tactics
Mission Planning
Mission Types
Campaign Strategy
Community
Articles
Forum
Downloads
Gallery
Links

A2A Wingman Tactics
by Dan "Crash" Crenshaw
Adapted for use in the Lock On: Modern Air Combat
With
the advent of Internet multiplayer competitions, wingman responsibilities
and wingman tactics are more important than ever. Many sims have fairly
comprehensive wingman instruction menus, but many people are not really
sure what they are commanding the wingman to do or when to use these
commands. While this article will emphasize tactics for multi-player
situations, many of the basics here will easily and readily apply to solo
player situations as well.
First I want to start out with an excerpt
from an actual Air Force Training manual:
Wingman Responsibilities
 "Wingmen
have the supporting role in a flight. They help the leader plan and
organize the mission. They have visual lookout and radar responsibilities,
and perform backup navigation tasks. Wingmen engage as briefed or when
directed by the leader and support when the leader engages. It is
essential that the wingmen understand their briefed responsibilities and
execute their offensive or defensive contract in a disciplined
manner."
"Wingmen
have the supporting role in a flight. They help the leader plan and
organize the mission. They have visual lookout and radar responsibilities,
and perform backup navigation tasks. Wingmen engage as briefed or when
directed by the leader and support when the leader engages. It is
essential that the wingmen understand their briefed responsibilities and
execute their offensive or defensive contract in a disciplined
manner."
What I would like to emphasize from this
short paragraph is the "SUPPORT" function. Many of us play solo
play like we are "MAVERICK" from the movie TOP GUN. And we do it
quite successfully despite the likelihood that it would not work in real
life. But if you coordinate and plan attacks, you will be stunned how much
easier the same exact situation becomes. Prime example here is the many
posts from people that have a difficult time winning a campaign in the
EF2000 family of products. Solo players get the feeling of me against the
world. In LAN play, the feeling is still there, except for a slight twist
… now it's YOU and 7 or more of your friends against the world. But if
we all decide we are a hot shot pilot that will win the war on our own …
we will fail. If we work as a team, victory becomes much more likely.
 Fighter
Squadrons operate as "2-ship elements" and "4-ship
flights". Missions are picked by the lead based on what would be the
most effective mission at this point in the war. Formations are formed and
tasked based on pilot mission preferences and flight requirements. Each
4-ship flight has a flight leader. The flight leader is considered the
primary point of contact for any information. Flight leaders communicate
between themselves and then pass this information along to their
respective flights (flight leads usually have at least a 2 radio set up at
our meets, command uses a different frequency from the flights, and each
wing has a specified frequency. This helps eliminate cross-talking and
mass confusion during A2A contact or strike actions).
Fighter
Squadrons operate as "2-ship elements" and "4-ship
flights". Missions are picked by the lead based on what would be the
most effective mission at this point in the war. Formations are formed and
tasked based on pilot mission preferences and flight requirements. Each
4-ship flight has a flight leader. The flight leader is considered the
primary point of contact for any information. Flight leaders communicate
between themselves and then pass this information along to their
respective flights (flight leads usually have at least a 2 radio set up at
our meets, command uses a different frequency from the flights, and each
wing has a specified frequency. This helps eliminate cross-talking and
mass confusion during A2A contact or strike actions).
During our meets, the wingman offers
information from their radar sweeps, and visual information. They take
commands from the flight lead for various tasks (Radar Sweeps, formations,
Drag or Bracket Engage, etc.). Wingmen will also offer up suggestions
during missions (when to perform radar sweeps, potential tactics, terrain
features that may prove beneficial, etc.) We switch off Flight Lead
responsibilities so everyone that wants the responsibility of Flight Lead
gets the opportunity.
Hopefully you now understand from the above, that discipline needs to play an important part of your multi-player experiences to gain the full benefit. Your human wingmen have a latitude and flexibility that computer wingmen do not have. Use this feature to your advantage. If the situation changes, change your tactics immediately.
"Flexibility
is the Key to Airpower...Indecision is the Key to Flexibility"
Warner
"Fozzie Bear" Trest
 Much
of the information included in this article has been derived from several
actual Air Force and Navy combat manuals as well as various strategy
guides written for some of the flight sims current and past. Most of these
tactics are used very effectively in Lock On: Modern Air Combat. Since
many flight simulations model various aspects better than others do, I am
trying to include everything that may be pertinent. Some of the cautions
taken on various maneuvers may be executed in vain in some sims, while
mandatory in others. These tactics would work very well in actual air
combat.
Much
of the information included in this article has been derived from several
actual Air Force and Navy combat manuals as well as various strategy
guides written for some of the flight sims current and past. Most of these
tactics are used very effectively in Lock On: Modern Air Combat. Since
many flight simulations model various aspects better than others do, I am
trying to include everything that may be pertinent. Some of the cautions
taken on various maneuvers may be executed in vain in some sims, while
mandatory in others. These tactics would work very well in actual air
combat.
It should also be noted that ranges are
based upon accurate weapons modeling. Increase ranges accordingly for
weapons carried that have a greater accurate kill range. While not stated
in the actual maneuvers, fighters should maintain about 3,000 feet or so
of separation between each other during an intercept. Formation placement
is offered as a positional reference. A good example of this is to watch
your computer run wingmen in 1998’s F-16C simulation Falcon 4.0 when you
give the "COMBAT SPREAD" maneuver command from flight formation.
Watch the fighters develop vertical and horizontal separation, but the
formation stays pretty much the same.
You will see several quotes from Major
Robey Price USAFR. Major Price has spent 15 1/2 years in the Air Force and
Air National Guard which included flying various fighter aircraft
(including the F-16 Falcon). I would like to thank Major Price for
proof-reading and his insightful real world input. Where at all possible,
I have opted for the F-16 pilots perspective as opposed to the various
other Air Force and Navy documents used in this article.
TACTICS
I will focus on a standard 2-ship element. These tactics can easily be applied to a 4-ship flight. In a 4-ship, each 2-ship element would perform as 1 fighter of a 2-ship element. This would then be evaluated after the first break where each 2-ship would then determine the best tactic to use for the current situation. A general and basic rule of thumb here, and this is really simplifying things: If you are a strike package and have an Escort … let the Escort do their job. Do not engage until all other available options are exhausted. If you have no Escort flight and are engaged before IP, both 2-ship elements should engage.
If you have no Escort flight and are engaged after IP, only the threatened 2-ship element should respond. The non-threatened 2-ship element should follow through with its mission.
I will not go into great detail about how
to execute these maneuvers except where necessary. Communication between
these 2 elements is essential during this entire combat phase. There are
many 2-ship intercept options, but most are variations on three basic
profiles: the Bracket, the Single Side Offset, and the Inside Out.
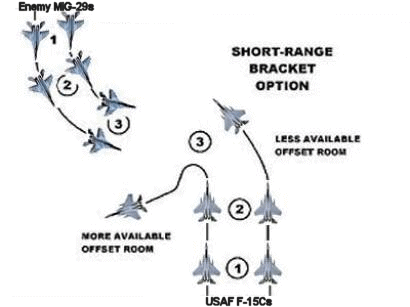
1.
The Bracket
The Bracket intercept is intended to
envelop or "squeeze" the target formation from both sides after
a front quarter merge. In many instances, a Bracket maneuver will be
initiated from a full head on or "High Aspect" merge.
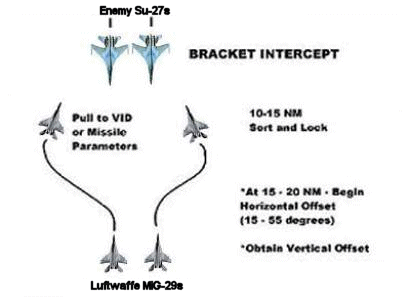
Entry into a Bracket maneuver is
initiated with an offset turn meant to bracket the bandit formation. This
offset turn should be initiated about 20 miles out (this is assuming the
use of AIM-120’s as a long-range missile). Maintain contact with your
wingman. Make sure you know where he is.
You must bracket early enough to get
around on the flank of the bandit formation. Thus your initiation of the
Bracket Maneuver will vary in distance dependant upon the size of the
bandit formation. Ideally, you want to start your Bracket outside of
visual range. An important point here is the visual range for the Bandit
getting a "Tally" on you...not necessarily you getting the
"Tally" on him. If you're "flying" a large airplane
like an F-15 "Eagle" or F-14 "Tomcat", then you must
Bracket farther out than if you're "flying" a F-16
"Falcon" or MiG-29G "Fulcrum". Maintain contact with
your wingman. Make sure you know where he is.
At about 10 to 15 NM, you should begin
the acquisition phase of targeting. It is imperative that you call your
target.
As an example:
“Crash” and “Rhino” are heading
N-to-S toward a bandit 2-ship. Crash is on the left side of the formation.
Rhino, his wingman, is deployed on the right side. As Lead, Crash says,
"Crash has the East man...Rhino take the west man." Rhino
acknowledges, "Two."
Use terminology that will not leave any
doubt as to your target. To take the time and effort to maneuver into
position only to have both aircraft launch on the same target is futile.
You can not afford to waste a missile on an already destroyed aircraft.
Also be careful not to "cross lock', or lock onto the target on
opposite side of the formation while your wingman locks onto the target on
YOUR side of the formation. This will cause an early collapse of the
formation. Constant communication is key here. Confirm your wingman's
location.
At about 12 to 8 NM, you would turn into
the bandit formation for a Pure Pursuit. It is at this time that you will
most susceptible to detection. Again, confirm Wingman location. The next
phase of the intercept will require close contact and possible support.
Your initial shot would happen about now.
Things happen very fast now. At 8 NM at a closure rate of 1200 or so
knots, you will be "in his chili" almost immediately … or the
bandit will be in yours. Now is the time you and your wingman must really
watch out for each other. You are into short-range missile range now and
if you didn't hit or kill your target, he is coming around on you now for
his chance.
Go to short range. Lets assume that both
aircraft missed their targets. Follow through your the flight path that
will take you through the bandits formation. This is often called
"Blow Through," as in a directive call from lead to the
formation to "blow through" so that slow speed "knife
fights" don't develop. Stay fast and regroup on the other side of the
bandits' formation. They should be jinking and trying to come around to
shoot back. Lock onto the bandit that is turning to the outside. If both
bandits break in the same direction, there are very good odds that one of
your flight will have a low aspect, high Pk shot on at least one of the
bandits. At this point you are into close combat. I will address that
later.
Executed well, you should have a shot at
the bandits while denying them a shot at you. All of this assumes that the
bandits cooperate and fly their designated flight path.
2.
Bandit Counters
The 3 most common defenses to the Bracket
are to maneuver away, a Wide Split or an Offset maneuver.
Maneuver Away
If the bandits turn away from the intercept, collapse the bracket and
convert the intercept into a single side offset intercept. It is virtual
suicide to continue a bracket in this event since it will force one of
your flight in front of the bandits. Lead Pursuit may speed you shot
parameters in this event.
Wide Split
If the bandits split wide, or the formation is wide to begin with, this
could lead to a potential Bracket situation against your flight. As lead,
the easiest counter here is to position you on the outside of the bandits.
This will most likely leave your wingman with bandits at 10 and 2 o'clock
in a bracketed situation. You will be required to protect the much more
vulnerable fighter in this scenario. You may also attempt an Inside Out
maneuver in this situation. This will be discussed later in detail. Care
must be taken when trying this; it could result in leaving both aircraft
in a very vulnerable position.
Offset
A third less likely used tactic to counter a bracket is the Bandit Offset.
In this maneuver, the bandits will attempt to counter a bracket by off
setting to one side and out numbering on of your flight. As soon as this
is detected, you must determine the target. This is the "HOT"
fighter (targeted or in a really bad position to allow it to be targeted
soon). The other fighter, "COLD" (this fighter is not engaged
and usually in a position to come into the fight in a rather advantageous
position … if he can get there fast enough), must take immediate action
to compromise the bandits plans. Become aggressive and get into the fight.
Once you have evened the odds again, you will be able to reanalyze the
situation and determine another plan of attack. In the offset situation,
it is very possible for the "COLD" aircraft to get in for a 6
shot on at least 1 of the bandits.
Advantages to the Bracket Intercept
are:
a) Multi-axis entry. Complication of the bandits visual acquisition on
both attacking fighter.
Any bandit reaction once the closure phase of the bracket begins will provide turning room to at least one attacking fighter that will lead to weapons parameters. At least 1-attacking unit should see enough of a bandit profile to VID if required (not as critical in a game setting, but vital in actual air combat ("Unless of course you only require EID like Desert Storm.", Major Robey Price USAFR))
Allows a "switch" option in the
event the bandits attempt an Inside Out counter.
Disadvantages:
a) A wide split is easily detected by enemy radar.
b) Wingman to wingman visual contact is difficult to maintain.
c) A bandit Split or Drag counter can force drastic plan corrections at
close range (inside 15 to 20 NM)
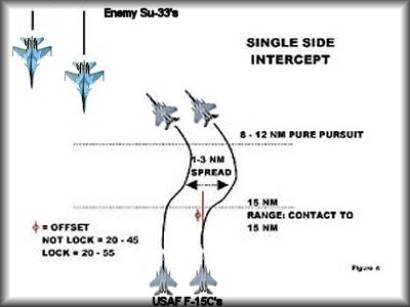
The
Single Side Offset Intercept
The
single side Offset Intercept can begin at virtually any distance beyond 15
NM. The object here is to get outside of the enemy radar cone and prevent
them from detecting your flight until you have launched on them within
high Pk (Probability of Kill) parameters. This maneuver has become
increasingly difficult as radar becomes better and the introduction of
JSTARS/AWACS style information availability.
"But the positive aspect is maintaining formation integrity and isolating the threat to one side. Plus you can get a good altitude split in your formation and still do an excellent SSO Intercept." Major Robey Price USAFR
a) At the call from the wing leader, the flight will put the bandit contacts at a 20 to 55 degree offset (the more altitude difference between you and the bandits, the less off set required).
"In
the F-16 we did "no lock" intercepts such as you're describing
using 30 to 40 degrees of offset. Hold the contact there until 10 miles
then go pure pursuit (look through the HUD for the Tally)." Major
Robey Price USAFR
If you have already obtained a passive
lock, you may pull to the higher end of this scale. Do not actually lock
onto any of the bandits at this time, as this will alert them of your
presence. You may wish to "sample". "SAMPLING" is very
short radar locks to ascertain altitude and airspeed (closure). The
outside aircraft should set the angle to prevent exceeding the radar
gimbal limits. It is recommended that the lead take the inside position
even if this requires a cross over maneuver. Flight lead could take the
outside position, which would give him better control over off set angle,
however ….
"Lead
taking the outside...maybe...but this forces the wingman to look Inside of
the offset for the bandits and then look back outside to maintain the
Visual on Lead. However you might permit #2 to drift inside to maintain
radar coverage (same problem). I always wanted #2 on the outside to clear
my 6 and if he loses the radar contact then he follows me to the merge
while clearing my 6." Major Robey Price USAFR
b) During this phase, a separation of 5000 feet or so should be affected between your element and the bandits. This allows turning room and introduces more decisions for the bandits to make as well and make you more difficult to spot. You should also determine targets for each fighter. Based on the formation and the likely formations available to the bandits, the inside fighter should most likely take the lead bandit while the outside aircraft takes the trailing bandit.
"Simple game plan
...well sort of simple. High tech bandits with less than 8 NM between Lead
and Trail go for the Trailers. High tech bandits with more than 8 NM
separation go for the Lead element." Major Robey Price USAFR
c) The outside fighter will actually pull ahead of the 3/9 line of the inside aircraft. Do not reduce power to maintain a "line abreast" formation. Neither should the inside fighter power up. As the break into pure pursuit is made, the fighter will naturally come back into position.
d) At 8 to 12 NM, pure pursuit should be
initiated … turn into the bandits. Put the bandits on the nose, look
through the HUD to get a Tally. By this point, you should have decided who
will attack what bandit. The Bandit will be on your nose and your merge
will be in the 3/9 line area of the bandit. Exactly how far back will
depend on closure speed and how late you break into Pure Pursuit. You want
to make your merge behind the 3/9 line. This should give you the advantage
of first shot. (In SU-27 version 1.5, it is very difficult to hold a lock
on a bandit that is "BEAMING" you - showing you his 3/9 line. A
Low Aspect merge, rear quarter, is desirable in this situation.)
Counters to the Offset Intercept.
The Offset Intercept is very flexible for countering bandit maneuvers. Normally if the bandits Drag or Flank, the intercept may continue by simply checking further into an Offset.
The most difficult counter to the Offset to defend against is the Wide Pincer Maneuver. Basically a wide split maneuver, a pretty solid defense is to have the inside fighter follow the farthest bandit to a Pure Pursuit. This could leave the fighter vulnerable to attack from the near bandit. It is therefore critical that the outside attacking fighter "center the dot" on the near bandit for a minimum time intercept.
An alternate counter for this is a Wide Split for the intercepting fighter to attack the near bandit. If there is a 10NM spread between the bandits, this would give you 30 seconds or so to "double team" the near bandit and get the kill so you could then turn on the second bandit at 2 to 1 odds. This can even be turned into a feint, so that the inside fighter maintains his lock on the far bandit as he heads for the near bandit. Once the other fighter launches at the near bandit, the inside fighter turns on the incoming bandit. This must be a clean break.
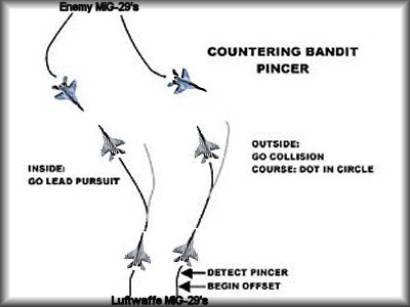
Bandits that turn into the Single Side Offset attack may be countered by moving into a visual bracket. Which if you already have the proper altitude split works very easily.
Advantages to the Single Sided Offset Intercept are:
Outside wingman can visually support
inside wingman.
Quick and easy response to bandit maneuvers.
Disadvantages of the Single Side Offset Intercept maneuver are:
Single axis
entry. Defensive reaction by bandits negates positional advantages.
Bandits will have easier time of locating interceptors, both visually and
by RADAR. Inside wingman may be forced into trail at pure pursuit ranges.
(Just behind other aircraft in combat range). Inside wingman can not
visually support outside wingman. ("The reason I want #2 on the
outside clearing my 6, while looking in my direction for the Tally on the
bandit." Major Robey Price USAFR)
Inside
Out Maneuver
The Inside Out option is useful for Close Range situations when you are committed to conflict with bandits bracketing and you have no time to out flank the bracket. This is NOT recommended as a primary intercept plan.
When faced with a short-range bracket
attack with a spread of a minimum of 7 NM, the Inside Out option can be
attempted. If you attempt this maneuver with a spread of less than 7 NM,
you will leave yourself exposed to a cross shot while you have no visual
or radar [contact] of your attacker. If there is not at least 7 NM
separation, consider an Offset to one side and leapfrog to the other
bandit after your initial kill.
If you chose an inside out maneuver, you have 2 options:
Turn towards one group or side of bandit. This will threaten those bandits and may force a reaction. This may instigate a turning fight at the merge. You must be very careful when, and if you enter this fight. A mis-calculation could expose you to a belly or 6 shot from the opposing side bandit. ("As he makes a blind side entry...a thing of beauty." Major Robey Price USAFR)
The second option is to maintain your course. This may lull the bandits into the assumption that they have not been detected. This may draw them into weapons parameter. However, the bandits may then have time to set up their own intercept. (Not good against human opponents!)
Since the Inside Out maneuver maintains
the formation in close proximity, you are able to counter most bandit
initiated maneuvers. A drag or flank attempt can easily be countered by
maintaining formation and altering heading accordingly.
If the bandit formation collapses but
maintains a nose on aspect, the Inside Out intercept will not work and you
should make a transition to a bracket maneuver or look for as much
vertical separation as possible. If the collapse is beyond 20 NM, a full
bracket may be initiated. The Inside Out is also a backup to the Bracket.
If at 15 NM during a bracket maneuver, the Bandit Split is too wide, an
Inside Out maneuver may be initiated.
If the bandit formation collapses within
15 NM, a visual offset for a quick bracket could be attempted. Do not make
a hard break or you will expose yourself to a launch. The idea here is to
create as much turning room as possible before the merge.
Advantages to the Inside Out Maneuver:
a) Intentions are hidden until very late
in the intercept.
b) Quick counters to Drag and Flank maneuvers.
c) Visual can be maintained all the way into pure pursuit.
Disadvantages to the Inside Out Maneuver:
a) Threat may pince the formation.
b) Flight path is predictable until close range (10 NM)
c) Mutual support becomes very difficult in Pure Pursuit and close combat
range.
d) It is possible to give the bandits turning room or a clean belly/6
shot.
With these 3 maneuvers, there is a
multitude of variations possible. Altitude variants, splits, use of
terrain features are only a few of the parameters that can be used to
create hybrids. There are several more common variants included in
different simulations. The most common and useful variant is the “Drag”,
affectionately know as the "Drag and Bag". Make sure you use
brevity code words in the heat of battle and just say Drag as the command
of execution. During this maneuver, one fighter (or flight of 2) will
decoy the bandits into following them. Usually a wide turn, locking up the
bandits and engaging ECM will get their attention.
As this is going on, the other flight will turn the RADAR off or to STANDBY (STBY), usually gain altitude and try to gain an undetected entry. As these two maneuvers coincide, the "Draggers" will regain visual mutual support and a safe distance from the bandits with room to run or re-enter the fight, while the "Baggers" maneuver in for a 6 shot and then re-engage RADAR. By the time the bandits know what is happening, they have been targeted, they go defensive and the "Draggers" can turn to engage. More often than not, by the time the decoys hook up with the "Baggers", the bandits are "morts" (dead). In the event that the "Baggers" are detected, they can drag and the Decoys can turn and become the "Baggers". Once the bandits have a Tally on a "Bagger" or team of "Baggers" the bandits usually direct their full attention to them due to their close proximity.
"
My Squadrons would use a sliceback or pitchback maneuver to head approx
135° from our original heading. This isn't a Beam/Flank but it doesn't
head straight back toward the trailing Fighters either. I don't recommend
trying to Drag once you've merged. If the Fighters elect to "Blow
Through" a merge they should have a plan. Our plan was always fairly
simple...Get Low, Get Fast, Get Line Abreast (for visual mutual
support.)" Major Robey Price USAFR
There you
have a basic, in a nutshell, set of guidelines to use for Intercept
Flights with LAN or Internet wingmen. Again, this is by no means
definitive, but a basic schooling. So now what? You have made the merge,
you have missed your target, you are moving to slow to "BLOW
THROUGH"? The Meat and Potatoes of Air Combat … the "Knife
Fight". What are a wingman's duties in this situation? First, you
must maintain composure in an arena of inmense Task Saturation. There is
so much happening so fast … and with a 4-ship flight, it is
geometrically worse. You primary duties in a "Knife Fight" is a
rather short list. After some discussions with Major Robey Price USAFR, I
decided that his words summed it up rather nicely:
"Rule
#1-Wingmen support their Flight/Element Lead by clearing his 6 and
positioning themselves to kill their Lead's bandit if the Lead loses the
advantage and becomes threatened. (This IS NOT like 12 guys in WB all
chasing a single bandit) It's #2 getting above the turning fight were he
can watch Lead's 6 and immediately point at the bandit if Lead makes a
mistake and finds himself on the defensive.
Rule
#2-Wingmen stay with their Flight/Element Lead. Wing should request
permission to engage [this is so we don't waste missiles and ensures at
least one set of eyes is checking 6] UNLESS they become threatened and are
engaged defensive. At that point defend yourself and kill your
bandit."
Other than
these basic guidelines, use your BFM to the best of your ability. There
are several good books and video's available to learn more about single
fighter BFM (The Art of the Kill is an excellent source). But just to get
you started we have a few last words of wisdom from Major Price:
Kill 'em
before the merge. If that fails there are three basic things you need for
a gun kill:
You must
be in range.
You must have your nose/gun out in lead pursuit.
For a "tracking" gun kill where you are "saddled up,"
you must be in plane with the bandit.
In the
F-15, BFM was distilled into two questions (since we could out-turn
everybody then). Am I inside his turn circle? If YES...Kill him. If
NO...see question 2.
How do I
get inside his turn circle? Fly to the "elbow" or control zone
(don't just point at the bandit and try to spear him with your pilot
boom.) Align your fuselage with his and go kill him."
With
practice of these maneuvers as well as communications, you can master
these techniques and make your LAN/Internet sessions much more enjoyable,
satisfying , successful and exciting.
Good luck
and good hunting.
Class dismissed!
Dan "CRASH" Crenshaw 209th VFS Delta Hawks

A-10 Warthog
United States Air Force Close Air Support Fighter
F-15C Eagle
United States Air Force Air Superiority Fighter
MiG-29G Fulcrum
Luftwaffe Air Superiority Fighter
![]()
This site is best viewed in 1024 x 768 resolution or above.
UBI Soft and other Logos belong to their respective owners.
2003-2004 NATO Fighter Tactics Training School